
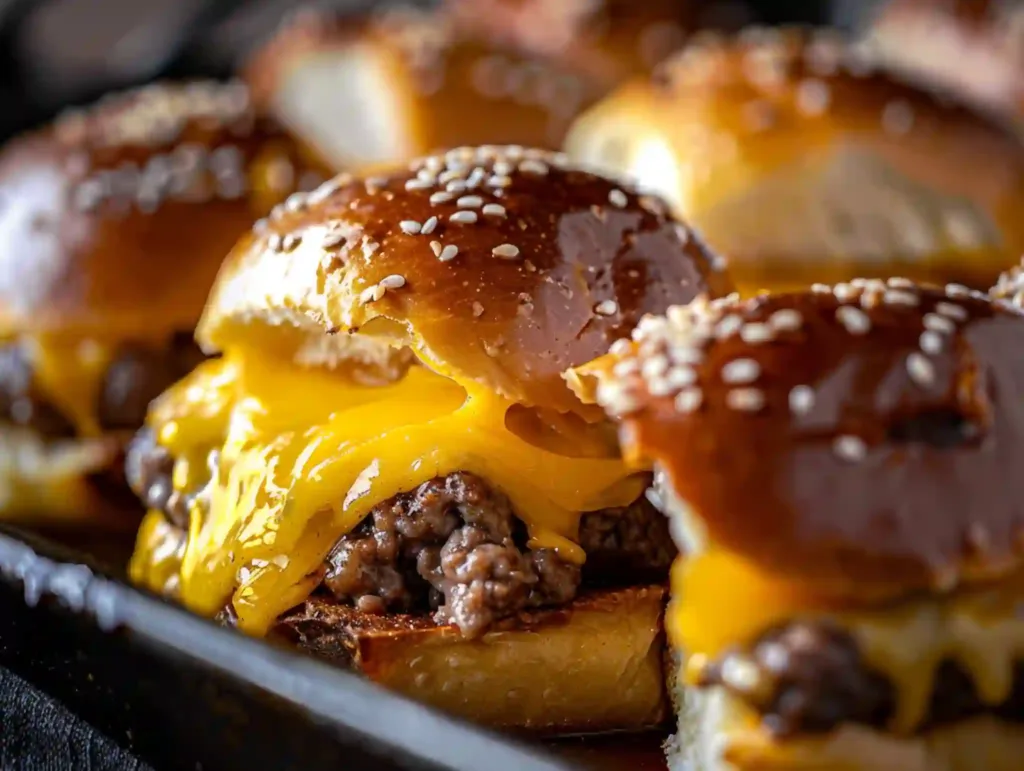
If you’re looking for a cozy, crowd-pleasing dinner, these cheesy ground turkey sliders are about to become a regular on your table. Juicy seasoned turkey, melty cheese, and soft slider buns baked together into one irresistible pan—this is the kind of recipe that works just as well for busy weeknights as it does for game day gatherings.
What makes these sliders special is how flavorful they are while still being simple and family-friendly. The ground turkey stays moist, the cheese pulls are irresistible, and the buttery sesame tops add that final bakery-style touch.
Why You’ll Love These Cheesy Ground Turkey Sliders
- Easy to make with simple, everyday ingredients
- Juicy and flavorful—no dry turkey here
- Perfect for sharing at parties, potlucks, or family dinners
- Make-ahead friendly and easy to reheat
- Kid-approved with mild, cheesy goodness
These sliders are proof that comfort food doesn’t have to be complicated.

Ingredients You’ll Need
Here’s what you’ll need to make these cheesy turkey sliders:
- 2 lb ground turkey
- 12 slider buns (Hawaiian-style recommended)
- 1 cup finely chopped onion
- ½ teaspoon garlic powder
- ½ teaspoon smoked paprika
- 1 tablespoon fish sauce (or soy sauce alternative)
- 2½ tablespoons ketchup
- 6 slices American cheese
- 1¼ cups shredded cheddar cheese
- 1 tablespoon butter (for cooking)
- 3 tablespoons butter, melted and slightly cooled
- 1 tablespoon sesame seeds
How to Make Cheesy Ground Turkey Sliders (Step-by-Step)
Step 1: Prepare the Turkey Filling
Preheat your oven to 350°F (175°C). In a large skillet over medium heat, melt 1 tablespoon of butter. Add the chopped onions and cook until soft and translucent.
Add the ground turkey, garlic powder, and smoked paprika. Cook, breaking up the meat, until fully browned. Stir in the fish sauce and ketchup, then remove from heat.
Step 2: Assemble the Sliders
Slice the slider buns in half horizontally, keeping them connected if possible. Place the bottom halves in a greased baking dish.
Spread the turkey mixture evenly over the buns. Layer the American cheese slices on top, followed by the shredded cheddar. Place the top buns over the cheese.
Step 3: Add the Buttery Topping
Mix the melted butter with sesame seeds. Brush generously over the tops of the buns for a golden, flavorful finish.
Step 4: Bake
Cover loosely with foil and bake for 15 minutes. Remove foil and bake an additional 8–10 minutes, until the cheese is melted and the tops are lightly golden.
Step 5: Serve
Let cool slightly, then slice into individual sliders and serve warm.
Tips & Variations
- Extra juicy turkey: Avoid overcooking the meat before baking
- Spice it up: Add a pinch of black pepper or smoked chili powder
- Different cheese: Colby Jack or mozzarella both work well
- Mini meals: Serve with a side salad or roasted veggies
- Party prep: Assemble ahead and bake just before serving

Easy Cheesy Ground Turkey Sliders Everyone Loves
- Total Time: 45 minutes
- Yield: 12 sliders 1x
Description
Juicy, cheesy ground turkey sliders baked on soft Hawaiian rolls with a buttery sesame topping—perfect for game day or an easy family weeknight dinner.
Ingredients
2 lb ground turkey
1 cup onion, finely chopped
1 tbsp butter (for cooking)
1/2 tsp garlic powder
1/2 tsp smoked paprika
1 tbsp fish sauce (or low-sodium soy sauce/coconut aminos)
2 1/2 tbsp ketchup
12 slider buns (Hawaiian rolls recommended)
6 slices American cheese
1 1/4 cups cheddar cheese, shredded
3 tbsp butter, melted and slightly cooled
1 tbsp sesame seeds
Instructions
1. Preheat oven to 350°F (175°C). Grease a 9×13-inch baking dish.
2. Melt 1 tbsp butter in a skillet over medium heat. Add onion and cook 3–5 minutes until softened.
3. Add ground turkey, garlic powder, and smoked paprika. Cook 6–8 minutes, breaking it up, until browned and cooked through.
4. Stir in fish sauce and ketchup. Cook 1 minute, then remove from heat.
5. Slice slider buns in half horizontally (keep attached if possible). Place bottom halves in the baking dish.
6. Spread turkey mixture evenly over buns. Layer American cheese slices, then sprinkle cheddar over top.
7. Place top buns on. Mix melted butter with sesame seeds and brush over bun tops.
8. Cover loosely with foil and bake 15 minutes.
9. Uncover and bake 8–10 minutes more until tops are golden and cheese is fully melted.
10. Rest 5 minutes, slice into sliders, and serve warm.
Notes
Fish sauce adds savory depth but can be swapped with soy sauce or coconut aminos.
For extra moisture, avoid overcooking the turkey before baking.
Make-ahead: assemble up to 8 hours ahead, cover, refrigerate, and bake when ready (add 3–5 minutes if cold).
Storage: refrigerate leftovers up to 3 days. Reheat at 325°F until warmed through.
- Prep Time: 15 minutes
- Cook Time: 30 minutes
- Category: Dinner
- Method: Baking
- Cuisine: American
Nutrition
- Serving Size: 1 slider
- Calories: 420
- Sugar: 6 g
- Sodium: 680 mg
- Fat: 22 g
- Saturated Fat: 10 g
- Unsaturated Fat: 10 g
- Trans Fat: 0 g
- Carbohydrates: 26 g
- Fiber: 2 g
- Protein: 28 g
- Cholesterol: 95 mg
Serving Ideas & Storage
Serve these cheesy ground turkey sliders with baked fries, coleslaw, or fresh fruit for a complete meal. Leftovers can be stored in an airtight container in the fridge for up to 3 days. Reheat in the oven at 325°F until warmed through.
Nutrition Facts (Per Serving)
| Nutrient | Amount |
|---|---|
| Calories | ~420 |
| Protein | ~28g |
| Carbohydrates | ~26g |
| Fat | ~22g |
| Fiber | ~2g |
| Sodium | ~680mg |
Final Thoughts
These cheesy ground turkey sliders are comforting, flavorful, and incredibly easy to make. Whether you’re feeding a hungry family or hosting friends, this recipe delivers big flavor with minimal effort—and chances are, you’ll be making them on repeat too.